
Script to Storyboard: Step-by-Step Guide

Turning a script into a storyboard transforms written ideas into visual plans, helping teams align before production begins. This process breaks down the script into scenes, identifies key visual and audio elements, and organizes them into a clear, actionable sequence. Whether you’re producing a film, corporate video, or animation, storyboarding ensures clarity, reduces miscommunication, and minimizes costly errors during production.
Key Steps Simplified:
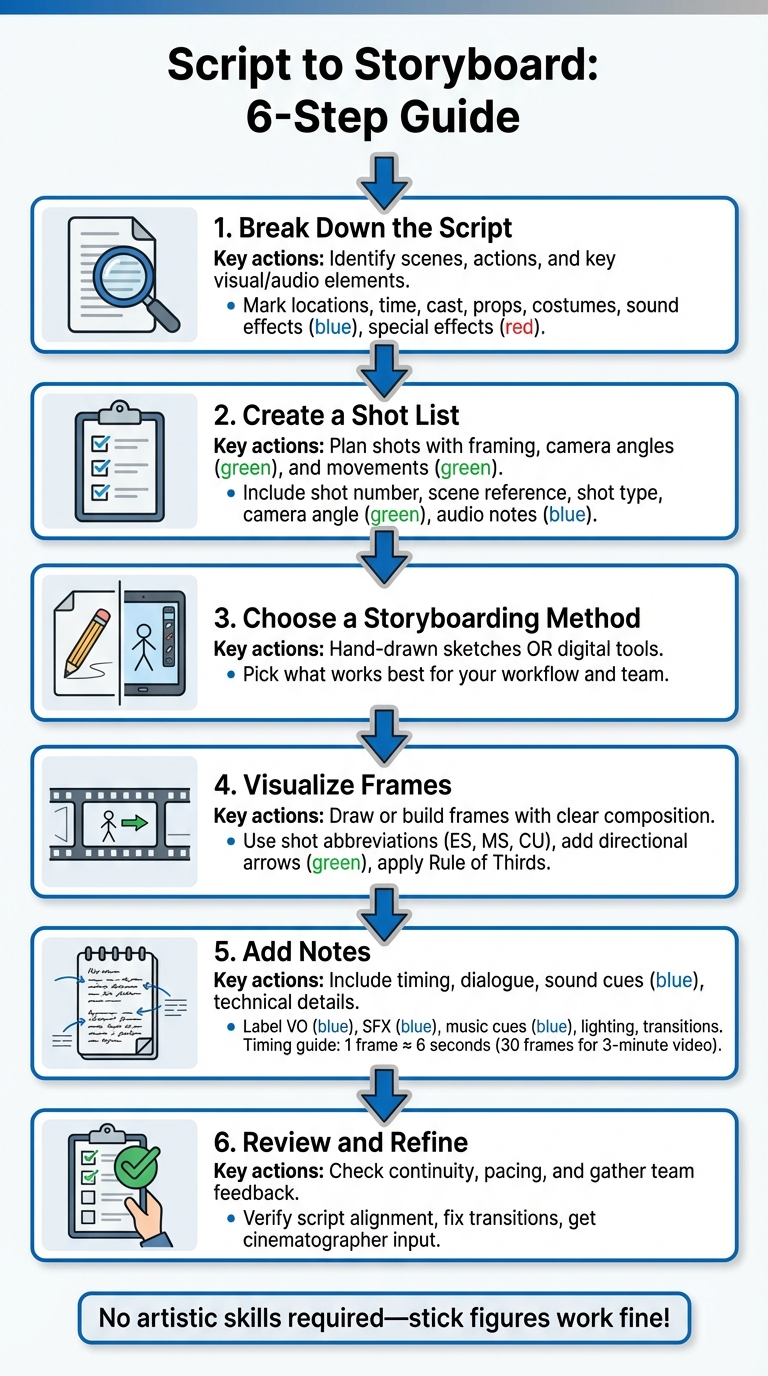
- Break Down the Script: Identify scenes, actions, and key visual/audio elements.
- Create a Shot List: Plan shots with details like framing, camera angles, and movements.
- Choose a Storyboarding Method: Hand-drawn sketches or digital tools – pick what works best.
- Visualize Frames: Draw or build frames with clear composition and camera movements.
- Add Notes: Include timing, dialogue, sound cues, and technical details.
- Review and Refine: Check for continuity, pacing, and team feedback.
Storyboarding doesn’t require artistic skills – stick figures or basic sketches work fine. Tools like Storyboarder, Canva, and StudioBinder can simplify the process. By planning visuals and production details upfront, you can streamline your project and focus on executing your vision effectively.
Script to Storyboard: 6-Step Production Process Guide
Step 1: Break Down the Script
To kick off your production process, start by breaking down your script. This step isn’t just about understanding the story – it’s about pinpointing the visual and technical details that will shape your storyboard and guide your crew through every scene. Think of it as laying the groundwork for both your visuals and your production plan.
Identify Key Scenes and Actions
Begin by splitting your script into individual scenes. Look for shifts in location (e.g., INT/EXT), time (Day/Night), or theme to mark transitions.
Once you’ve sorted the scenes, zoom in on actions and dialogue that demand visual attention. Not every line or detail needs its own frame – instead, focus on moments where something changes visually or emotionally. For instance, a character’s subtle expression, an important action, or the introduction of a new element like a prop or setting might need its own panel. A dynamic sequence, like a car chase, could require multiple frames to capture different angles, speeds, or movements.
Here’s a tip: Read the script twice. On the first pass, focus on the emotional flow and narrative. On the second, highlight technical and visual details. This way, you’ll cover both the story’s essence and the practical elements needed for production.
Mark Visual and Audio Elements
After identifying scenes and key actions, shift your attention to the specific visual and audio components. For each scene, tag essential elements such as cast members, props, set dressing, costumes, and special effects. To stay organized, use a consistent color-coding system to differentiate between these categories.
Don’t forget to tag audio elements like voiceovers, sound effects, and music cues, as these directly influence shot framing and pacing. For scenes with intricate performances, make detailed notes about key dialogue and actions to ensure everything is captured. If a door slams or a phone rings, mark it clearly so the storyboard reflects how audio and visuals interact.
"A script breakdown is an important filmmaking process that allows you to identify all the script elements needed to prep, schedule, and budget a film production." – StudioBinder
A practical tool for this step is the 1/8th page measurement. Divide each script page into eight 1-inch sections to estimate how many shots and storyboard panels you’ll need. This method helps you gauge timing and keeps the entire team aligned throughout production.
Step 2: Create a Shot List
Once you’ve broken down your script, the next step is to create a shot list. This document is like your filmmaking roadmap, turning story beats into specific, filmable shots. It ensures that every frame needed to tell your story is planned out and ready to capture.
"A shot list is like a shopping list to make sure you get every shot you need to tell the story." – StudioBinder
A well-prepared shot list keeps your director, cinematographer, and editor on the same page regarding visual style and pacing – long before the cameras start rolling.
Organize the Shot List
To make your shot list effective, include these key columns:
- Shot Number: A unique identifier for each shot, making it easy to reference during production and editing.
- Scene Reference: Links the shot back to specific scenes in the script.
- Description: A brief outline of the action taking place in the shot.
- Shot Type: Specifies the framing, such as Wide Shot (WS), Medium Close-Up (MCU), or Close-Up (CU).
- Camera Angle: Indicates the perspective, like Eye Level, High Angle, or Low Angle.
- Camera Movement: Notes any planned motion, such as Static, Pan, or Dolly.
- Audio/Dialogue Notes: Highlights any critical sound or dialogue elements.
To save time on set, group your shots by location or camera setup instead of following the chronological order of the script. This approach reduces equipment changes and downtime, keeping production efficient.
For clarity, bracket sections of your script with shot numbers and types (e.g., 1-WS, 2-CU) to ensure every action is covered and no moments are missed.
| Shot List Element | Description | Purpose |
|---|---|---|
| Shot Number | Unique identifier for each shot | Keeps production organized and simplifies referencing |
| Shot Type | Framing (e.g., WS, MCU, CU) | Defines the visual style and scale of the frame |
| Camera Angle | Perspective (e.g., Eye Level, High, Low) | Adds emotional depth and meaning to the scene |
| Camera Movement | Action (e.g., Static, Pan, Tilt, Dolly) | Shapes the pacing and energy of the sequence |
| Description | Brief summary of the action | Provides a quick overview of what’s happening in the frame |
| Subject/Cast | People or objects in the shot | Ensures all necessary elements are accounted for |
Focus on Priority Shots
Not every shot is equally important. Some visuals carry more weight in telling your story. Start by identifying your key shots – establishing shots that set the scene, close-ups that capture pivotal emotions, or action sequences that drive the narrative. These are your "hero" shots, and they should be your top priority during production.
"A shot list is like a blueprint that acts as a roadmap for your entire project offering a structured plan that everyone can follow and allows the director on set to manage the crew." – DMV Productions
Capture these critical shots first, especially if they depend on specific conditions like golden hour lighting or specialized equipment. Non-essential shots can be labeled as "Nice-to-Have." This way, the crew knows what can be skipped if time or resources run short, avoiding unnecessary reshoots later.
Step 3: Pick a Storyboarding Method
With your shot list ready, the next step is to choose a storyboarding method that helps keep your production on track. You can go with either hand-drawn or digital storyboarding, depending on your needs and preferences.
Hand-Drawn vs. Digital Tools
Hand-drawn storyboarding involves using good old-fashioned pencil and paper to sketch out each frame. It’s a great choice if you’re working solo, enjoy drawing, or want to quickly jot down ideas without worrying about software. This approach is perfect for brainstorming and getting your initial vision on paper.
On the other hand, digital storyboarding uses software or design platforms to create your frames. These tools often include features like drag-and-drop functionality, stock image libraries, and automated layouts. Digital methods are ideal if you’re presenting to clients, working with a team, or prefer a polished and flexible format. You can easily rearrange frames, add notes, and export professional-looking PDFs in no time.
Many professionals combine both methods:
"I always do the first batch of boards. Then a real artist comes in who turns my stick figures and arrows into actual drawings."
For example, you could start with rough sketches on paper, then upload them to a digital tool for refining and sharing with collaborators.
| Feature | Hand-Drawn Storyboarding | Digital Storyboarding Tools |
|---|---|---|
| Speed | Quick for initial ideas | Fast for revisions and reordering frames |
| Skill Level | Requires some drawing ability | User-friendly for non-artists |
| Editing | Involves erasing or redrawing | Easy to update, move, or delete cells |
| Collaboration | Hard to share in real-time | Supports real-time feedback and multi-user edits |
| Resources | Low cost (just paper/pencil) | May require subscriptions or specific hardware |
| Output | Physical boards or scans | Professional PDFs, slideshows, or animatics |
If you’re leaning toward digital tools, there are plenty of options to suit different budgets and project requirements.
Digital Storyboarding Tools
Digital tools come packed with features for projects of all sizes. Here are a few standout options:
- Storyboarder: Free and compatible with Mac, Windows, and Linux, making it a solid choice for those on a budget.
- Canva: Offers a free version with drag-and-drop tools and AI-generated images, perfect for beginners who don’t draw.
- StudioBinder: Starting at $29.99/month, this tool integrates storyboards with shot lists and calendars, syncing script changes across documents.
- Storyboard That: At $14.99/month, it provides customizable characters and scenes for quick mockups.
- ShotPro: A one-time purchase of $39.99 (or $25/month for desktop) gives you detailed 3D visualization, ideal for iPad and iPhone users.
- Vyond: Starting at $89/month, this platform is great for creating animated explainers or business videos with pre-built assets.
When choosing a digital tool, focus on features that save time and streamline your workflow. Look for options like script integration (to auto-generate panels), asset libraries with ready-made characters and scenes, real-time collaboration tools, and exporting capabilities for polished, branded PDFs. Many tools offer free versions or trials, so test them out to see which one fits your needs before committing to a subscription.
Step 4: Draw or Build Visual Frames
Turn your shot list into detailed visual frames to clearly convey your vision to the production team.
Highlight Key Visual Details
Break down each scene into its critical moments – where actions unfold, characters interact, or the story takes a turn [8,15]. Each frame should include four key elements: the characters involved, any necessary props, the setting or location, and the main action taking place [25,10].
You don’t need to be an artist – simple sketches will do [8,25,14]. Use standard shot abbreviations like ES (Establishing Shot), MS (Medium Shot), CU (Close-Up), OTS (Over the Shoulder), and POV (Point of View). Label each frame with its corresponding shot number (e.g., S3.2) for easy reference [14,10].
To make your frames even clearer, include directional arrows to show movement – whether it’s a character stepping back or the camera panning across a scene [27,14]. Add brief notes for dialogue or voiceover cues under each frame to keep the visuals aligned with the audio [8,9].
Once your basic frames are in place, focus on refining them with thoughtful composition and clear camera movements.
Enhance Composition and Camera Movements
Good composition helps guide the viewer’s attention. Use the Rule of Thirds by dividing your frame into a 3×3 grid and positioning subjects along the grid lines or intersections.
Clearly mark camera movements using both written terms (like PAN RIGHT) and arrows. Common terms include pan (horizontal movement), tilt (vertical movement), zoom (adjusting the focal length), dolly (moving the camera closer or farther), and tracking (following the action).
Draft your frames in the final aspect ratio of your video – 16:9 for widescreen or 9:16 for vertical formats like social media – to ensure everything fits properly on screen [27,10]. Use leading lines – such as roads, fences, or architectural elements – to draw the viewer’s eye toward the main subject and add depth to the shot. When planning transitions between shots, note whether they’ll be hard cuts, fades, or dissolves to ensure the narrative flows smoothly.
Step 5: Add Notes and Production Details
Every visual frame in your storyboard should come with clear annotations to make production as seamless as possible.
Add Dialogue and Timing
Place dialogue or voiceover (VO) cues directly beneath each panel. If your script includes narration, label it as VO to differentiate it from on-screen dialogue.
Include the duration for each shot (e.g., 0:05s or 30s per scene) to help editors plan transitions and ensure your project stays within its time limits. This is especially important for commercials or social media content, where timing is often non-negotiable. As a guideline, one frame typically represents around six seconds of video. For instance, a three-minute video would require about 30 frames to cover the entire sequence.
After handling dialogue and timing, move on to audio and technical details to give your crew everything they need.
Include Audio and Technical Details
Add notes for sound effects (e.g., SFX: Door slam) and music cues (e.g., Music: Upbeat tempo begins) to help the sound team align audio with the visuals. These cues ensure the sound design complements the action on screen.
Specify lighting setups (e.g., bright overhead, high-key), special effects like CGI explosion, and scene transitions such as fade to black, jump cut, or cross-dissolve. To make the storyboard even easier to navigate, use color-coding: green for camera movements, blue for audio cues, and red for special effects.
Step 6: Review and Refine
After completing your storyboard with all the visual frames and production notes, it’s time to give it a thorough review before moving into production.
Arrange and Check Frames
Start by laying out your storyboard in chronological order to ensure the visuals align with the flow of your script. This step helps you spot issues like continuity mistakes – think mismatched costumes or misplaced props.
Go frame by frame, matching each one to your script’s dialogue or voiceover cues. This ensures the visuals sync perfectly with the spoken lines. Look for any illogical transitions, time inconsistencies, or unnecessary shots. A quick tip: try a silhouette check – view the frames without detailed elements to confirm that the actions are clear and easy to follow.
Pay close attention to pacing. If you’re working on a project with strict time constraints, like a 30-second commercial, double-check that the timing of each shot fits within the overall duration. Once everything looks solid on paper, it’s time to bring in your team.
Get Team Feedback
Run through your storyboard with your team, panel by panel. These collaborative sessions are invaluable for catching unclear ideas and gathering input on things like dynamic camera angles or smoother transitions. If possible, involve your cinematographer early on to get technical advice that can improve the layout.
During the feedback process, ask specific questions: "Do the visuals make sense?", "Does the story flow smoothly?", and "Is the message coming across clearly?" This is also a good time to identify any missing scenes or transitions that were in the script but didn’t make it into the storyboard. To keep each frame focused, consider using a one-sentence purpose statement for clarity.
Conclusion
Key Takeaways
Turning a script into a storyboard gives you a visual roadmap that guides the entire production process. Start by breaking your script into scenes, then create a detailed shot list. Decide on the storyboarding method that works best for your project, sketch out visual frames, and include essential production notes like dialogue, timing, and technical details.
Careful review and refinement are crucial. This ensures each frame connects seamlessly, helping to anticipate potential challenges and keeping your team – whether cinematographers, editors, or others – on the same page. Plus, it minimizes the risk of expensive reshoots down the line.
Next Steps for Your Project
With your storyboard in place, it’s time to put these strategies into action. For instance, if you’re working on a three-minute video, you’ll typically need around 30 storyboard frames to clearly outline your vision. Whether you’re drawing by hand or using digital tools, the goal is to translate your ideas into a format that your team can easily follow.
For more intricate projects that require a polished touch, consider teaming up with Dreamtown Creative (https://dreamtowncreative.com). They specialize in video production and animated explainers, offering the expertise to turn your script into production-ready storyboards while guiding your filming process from start to finish.
FAQs
What are the advantages of using digital tools for storyboarding instead of drawing by hand?
Digital storyboarding tools have revolutionized the way storyboards are created, offering a quicker and more adaptable alternative to traditional hand-drawn methods. These tools bring together scriptwriting, shot planning, and visual layouts into one convenient workspace, making it simple to update, organize, and share your ideas. Unlike hand-drawn panels that demand manual redrawing for every revision, digital tools allow you to make changes with just a few clicks – saving both time and effort.
One standout feature is cloud-based collaboration. Team members can review, comment on, and update storyboards in real time, no matter their location. You can also add tags to panels for details like camera movements and frame rates, ensuring that everything stays well-organized and easy to access. On top of that, digital files eliminate the hassle of physical storage and offer version control, so you can effortlessly revisit earlier drafts without starting from scratch. These advantages not only help keep your production on track but also cut down on overall costs.
How can I create a storyboard that clearly communicates my vision to the production team?
To make your storyboard clearly communicate your vision, start by dividing the script into distinct scenes and labeling each with a scene number to keep things organized. For each shot, create simple visual panels that illustrate the composition, character positions, and camera angles. Beneath each panel, include brief notes outlining key details like actions, dialogue, camera movements, and any special effects or lighting directions. Sticking to a consistent storyboard template can help your team easily follow the flow.
For even greater precision, consider adding technical details such as shot duration or specific equipment needs. This extra layer of information ensures everyone on the production team is aligned with the desired outcome. Once your storyboard is complete, review it with your team to gather feedback and make any necessary adjustments before filming starts. If you’re looking for expert support, Dreamtown Creative can provide polished visuals and ensure your storyboard fits seamlessly with your brand’s story.
What are the essential components of a shot list for a smooth production process?
A well-structured shot list is essential for keeping production efficient and ensuring everyone on set stays aligned. Here’s what you should include:
- Shot number and scene reference: Assign a unique identifier linked to the script for quick and easy navigation.
- Shot description: Provide a concise summary of the action, dialogue, or visuals within the frame.
- Camera details: Specify shot size (like close-up or medium), angle, movement (such as pan or tilt), and any special gear required.
- Location and set details: Highlight where the shot will take place, along with notes on setups and lighting needs.
- Props and wardrobe: List any specific items or costumes required for the scene.
By including these details, you can minimize miscommunication, avoid unnecessary reshoots, and keep the production on track. For added convenience, Dreamtown Creative offers customizable shot-list templates to help your projects run smoothly from start to finish.